


3.
Windows® Installation and Programming of CodeWarrior®
This chapter explains the installation procedure for the CodeWarrior Professional software package on PCs running Windows®. The chapter also provides you with an example program to create a simple console application using CodeWarrior. The topics in this chapter are:
Windows System Requirements

The CodeWarrior IDE requires the following hardware and software:
Table 3.1 Windows Requirements
Installation Overview on Windows
The installation software on the CodeWarrior Professional Windows Tools CD-ROM installs all the necessary components you will need to use CodeWarrior.
Before You Install
Before installing the software on your Windows computer, you should:
Figure 3.1 Metrowerks installation options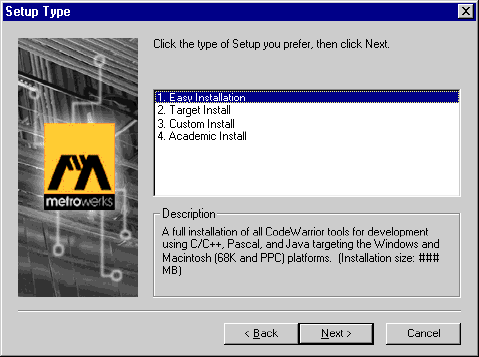
1. Read the CodeWarrior/Metrowerks Software License.
Make sure you understand and agree with the "Metrowerks Software License Agreement" before installing the software.
2. Make sure your software package is complete.
This software package should contain:
1. QuickStart Professional guide (optional on some products)
2. A CodeWarrior Professional Windows Tools CD
3. A CodeWarrior Professional Reference CD
4. A registration card
5. Geekware catalog
 NOTE
NOTE
If any of these items are missing, contact your local distributor or Metrowerks sales (sales@metrowerks.com). See "Metrowerks Support" for more information.
3. Make sure your computer system meets the specified hardware and software requirements.
See "Windows System Requirements".
4. Quit all running applications before installing.
To avoid installation problems, it is highly recommended that you quit all running applications before launching the CodeWarrior installation software.
 WARNING!
Be sure to turn off all virus protection software before running the installation software.
Windows Installation Procedure
To install CodeWarrior Professional on a computer running Windows:
1. Back up and remove previous versions of CodeWarrior.
The installation software on CodeWarrior Professional can't successfully install a new version of CodeWarrior if an older version of CodeWarrior already exists on your computer. To remove the old version of CodeWarrior, launch the Uninstall CodeWarrior program. This program is available from the Start menu.
2. Launch the CodeWarrior installation program.
Insert the CodeWarrior Professional Windows Tools CD into your CD-ROM drive.
If the Auto Insert Notification setting for your CD-ROM drive is enabled, a dialog box will appear automatically when the CD is inserted or when you double-click the CD icon. Click Launch CodeWarrior Setup to begin installing CodeWarrior.
Alternately, double-click the CD icon, then double-click the file named Setup.exe in the CD's top folder to begin installing CodeWarrior.
In a moment a window appears, welcoming you to CodeWarrior Setup. Click Next to continue to the software license.
 TIP
TIP
You can click Cancel anytime during the setup process to stop the installation and exit the installation program.
3. Read and agree to the software license.
When the software license appears, please read it. If you agree to its terms, click Yes to continue installation. If you do not agree, click No to exit the setup program.
4. Read the installation notes.
When the installation note appears, please read it for any last minute information on this release. Click Yes to continue.
5. Set your CodeWarrior options.
The CodeWarrior Installer will now walk you through a series of dialogs, asking questions to determine what should be installed, where it should be installed, and various other installation options before installation begins. Just follow along, answering the questions until you reach the summary window.
6. Review your choices.
Review all your installation choices. If you aren't satisfied, use the Back button to make changes. Otherwise, click Next to start the install operation. The Setup.exe program installs the chosen CodeWarrior components on your hard disk. You are required to Restart your computer at this point.
7. After installation, read the release notes.
After installation, please read the file "What's New" for the latest release information, and refer to the Release Notes directory for additional release details. For information on CodeWarrior's Y2K compliance, please read the note on "CodeWarrior Year 2000 Compliance."
8. Install CodeWarrior documentation and examples.
Repeat steps 1 through 8 using the CodeWarrior Professional Reference CD to install the CodeWarrior documentation, programming examples, third-party books, and other programming goodies.
TIP
Some of the documentation on the Reference CD exists in uncompressed format to allow direct viewing on the CD.
9. Install a browser.
A browser, like Microsoft Internet Explorer (MSIE) is required to access the HTML documentation. If you don't already have a browser on your hard disk, the MSIE installer can be found in the Documentation\Viewers folder on the CodeWarrior Professional Reference CD.
10. Install Adobe Acrobat.
To read the PDF documentation, Adobe's Acrobat Reader must be installed on your hard disk. If you don't already have Acrobat on your hard disk, launch its installation software in the Documentation\Viewers folder on the CodeWarrior Professional Reference CD.
What's Installed
Once the installation software is finished, you will have a Metrowerks folder installed on your hard disk. Inside will be all the components you chose during installation. See the documentation for information on what has been installed.
Creating a Windows Application
With CodeWarrior up and running on your PC, follow the steps below to create a simple console application.
1. Choose the File`New menu item.
A New window appears.
2. Select the "C Console App" stationery.
The filename is highlighted.
3. Enter project name.
Type in a project name (we used Test.mcp) and give it the .mcp extension. This enables the IDE to recognize the project as a CodeWarrior project.
4. Select the location to save the project.
5. Click OK.
The New Project window closes and the Name New Project As window appears
NOTE
Enable the Create Folder box in the New Project window to create a new folder for your project in the selected location
6. Click Save.
The Name New Project As window closes and a new project based upon the chosen stationery is created.
7. Choose the File`New menu item.
A new empty editor window opens.
8. Choose File`Save.
The Save dialog box appears. Name the source file as Hello.c and click Save. The .c extension enables the CodeWarrior IDE to recognize it as a source code file.
9. Enter the example code.
/* hello.c */
#include <stdio.h>
main(){
printf("Hello Metrowerks\n");
return 0;
}
NOTE
A hello.c file exists in the new project. Please ignore the existing file and proceed with the steps to create a new file with the example code.
10. With the editor window frontmost, choose Project`Add Window.
The Add Files window appears. Use this window to specify which build targets should use the Hello.c file.
11. Click OK.
The Hello.c file is added to all build targets in the project window.
12. Select main.c in the project window.
The main.c filename is highlighted.
13. Choose Project`Removing Selected Items.
The main.c file is removed from the window.
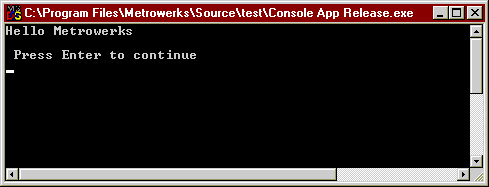
14. Choose Project`Run.
The console project is compiled, linked, and run (Figure 3.2).
Figure 3.2 Console output for Windows.
Congratulations! You just created a program using the CodeWarrior IDE on Windows. For information on programming resources, please refer to "CodeWarrior Documentation."
Visit the Metrowerks website at: http://www.metrowerks.com
For assistance contact Metrowerks Technical Support at: support@metrowerks.com
Copyright © 1999, Metrowerks Corp. All rights reserved.
Last updated: May 25, 1999